If you are among 120 million active Steam users, you can enjoy about 50 thousand different Steam games. But, regardless of the game you play, users may and do report reported problems with screenshots they’ve taken. Though there are many issues, you’re not alone if you took a screenshot in Steam, noticed it turned out blurry, and started wondering why that is and how to fix it. We can help.
Common Causes of a Blurry Steam Screenshot
Your screenshots are coming out blurry because of the way Steam renders images. When you take a screenshot, Steam captures what’s on the screen at that particular moment. However, it sometimes doesn’t consider the fact that monitors display images at different resolutions. As a result, the image is rendered at a lower resolution than what your monitor is displaying, which results in blurriness.
This is because they’re using a lossy compression algorithm on the screenshots to save space on Steam servers. These algorithms reduce an image in size while also lowering the quality, for example, in the JPG/JPEG format.
Additionally, at some point, even if the image is not compressed to JPEG/JPG, the resultant image is still blurrier than the one in the real-time gameplay. Fortunately, there are a few things you can try to fix the problem on your end. All you need to do is change some settings in Steam.
Reasons why Steam Screenshots are blurry
There can be several reasons behind a blurry Steam screenshot, ranging from hardware issues to bugs and even incorrect installations. Although the blurry screenshot error is quite simple to troubleshoot, it is only possible when one knows the real cause behind it, which is what we will be attempting to learn.
- It can be caused by your in-game resolution settings. If the game is running at a lower resolution than your display, it might result in a blurry screenshot.
- Sometimes, Steam Overlay might also cause interference with screen captures.
- Steam compresses most screenshots to save space. Although it makes the screenshot blurry, it is only temporary.
- If you have hardware acceleration turned on, then it might cause a blurry screenshot as a result.
- Outdated graphics drivers can also cause it.
- Steam might be saving the screenshot in a format that is not supported by the image reader.
- The display setting of the game might be in conflict with the native screen display.
- If you are on Steam Beta, then chances are it is a related glitch or bug.
- Third-party overlays can also cause issues with screenshots.
How to Increase Steam Screenshot Quality?
To take a full-quality screenshot, press and hold the Alt and F1 keys together. Alternatively, if you’re using ENB (Enhanced Natural Beauty), hit PrntScr (Print Screen) or Insert to take a high-quality photo (most likely PrntScrn for recent versions of ENB).
Additionally, in Steam’s settings, you may alter Steam so that it saves uncompressed images. These are the basic rules for taking clear Steam screenshots:
- Screen Size: Fill the whole screen with the window you want to capture.
- Picture Format: Choose the PNG format over JPEG when saving your screenshots. Go to settings > in-game, then save an uncompressed copy. The image will be saved as PNG and will not be compressed.
Enable Windows Advanced Scaling Settings
Open the Start menu in Windows 10 or 11. Now:
- Search for “display” and select Display settings.
- Under the “Advanced scaling settings” section, select Advanced scaling.
- Switch the slider next to “Let Windows try to fix apps, so they don’t look blurry” from ‘off’ to on.

To save a screenshot now, press F12, the default Screenshot key. The Steam Screenshot Uploader window will display if you close the game. Now you can check the image quality and your screenshots should now be coming out crystal clear. If they’re still blurry, try adjusting the resolution in-game until they look right.
Fix the Blurry Steam Screenshot Problem for Specific Games
Some games have a tad more screenshot-related options, for instance, the newer Counter-Strike ones. Follow the steps below to reduce the blurriness of your screenshots in supported games:
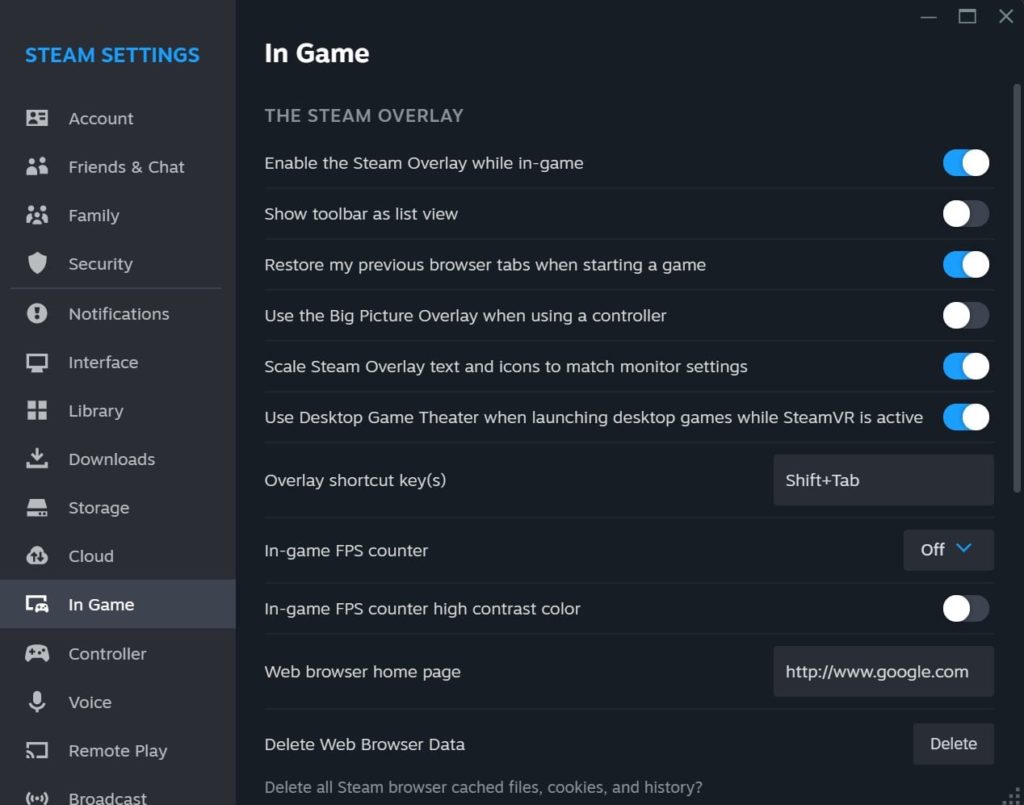
- Go to the Steam settings before opening the In-Game tab.
- Select the checkbox “Save an uncompressed copy.”
- Select the “Screenshot” folder and create a separate folder for your Steam screenshots. Ensure you remember the screenshot key combination.
- Verify that the current game you’ll be capturing has the “Steam Overlay” option turned on. Take as many screenshots with the Steam screenshot shortcut key.
- Quit the game. This is optional since you can still access the screenshot directory with the game running.
- If you exit the game, the Screenshot window appears to handle your new pictures (save, delete, or publish them). You can safely close this box.
- If you’re still in the game, go to View to choose the Screenshots option.
- Locate your PNG photographs in the previously configured screenshot folder.
Disable Steam Overlay
If you have enabled your Steam Overlay and are getting blurry screenshots, then try disabling it, as the function has been known to cause issues with screenshots and other features. Here’s how you can disable it:
- First, launch Steam.
- Then go to the Library.
- Look for the game that is having trouble with the screenshots.
- Right-click on the title and select Properties.
- Toggle the Steam Overlay option off and save the changes.
Note: You can also disable Steam Overlay entirely, for all the games, by simply going to the settings.
Opt out of Steam Beta
If you are a Steam Beta user, the risk of bugs and other glitches increases exponentially. Thus, if you are getting a blurry screen while being a member of the Steam Beta, try to opt out of it. All you have to do is go to Settings after launching Steam and look for Steam Beta. After that, toggle it off.
Change Screenshot Format
Lastly, you can try to change the format of the screenshots. Follow these steps to do so:
- First, go to the Steam app.
- Then, click on Settings and look for the In-Game tab.
- Click on it and go to the Screenshot Shortcut Keys section.
- Here, you will find the Screenshot Folder, click it and change the format from the drop-down box.