
Adding a table of contents section to your Microsoft Word documents will make it easier for the users to jump to desired sections quickly. They will not have to scroll down to the 110th page of your essay to reach a certain section or use the Word search feature. Especially if your documents are very large and contain hundreds of pages, it is a good idea to put a table of contents block at the top of the document listing all the important sections of the content. That’s what we are going to discuss today.
Why should you add a Table of Contents in Microsoft Word?
Does Table of Contents still matter now that computers and smartphones have bookmarks and extensive search capabilities? The short answer is yes. Even though long texts can be navigated without using a Table of Contents, that’s not all there is to it. Let’s have a look:
- It provides a bird’s-eye view of the document to the reader. It’s like an outline showcasing which topics are covered in a specific document.
- TOC gives a proper professional appearance. A well-made table of contents makes a document appear more organized and neat than one without a TOC.
- It serves as the author’s main tool for organization. The initial draft of a TOC can assist you in organizing your thoughts and possibly serve as a brainstorming tool. Most people think of it as a roadmap.
- It facilitates an easier breakdown of the topics to discuss or go through in a meeting or simply understanding the author’s perspective with a quick look. Just by taking a quick look at the TOC, your teacher or even yourself can determine whether the content is worthwhile to read for you or not.
Steps to Insert Table of Content in Word
- Move your cursor to the area where you want the Table of Content to be.
- Navigate to the References tab.

- Click on the Table of Contents icon.
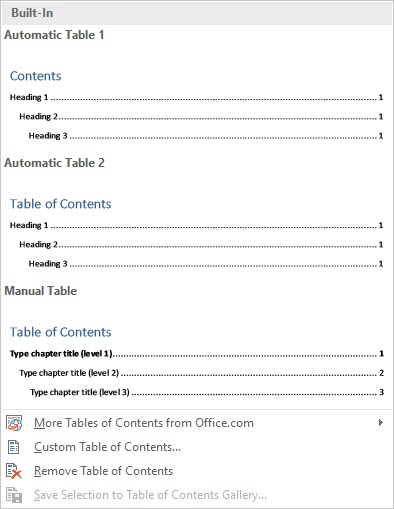
- Choose the preferred format.
The table of contents section should now appear in the selected area of the document. If it isn’t working or not showing your headlines, you should make sure that the headings are formatted as headings. Just bolding the characters won’t make your headings appear in the table of contents section.
If you wish to change the formatting or configuration of the table of contents section in Word, you can just right-click on it and do your customizations.
While customizing the formatting of the headlines that should appear in the table of contents, you should make sure that you are changing the formatting in the headings section in Home > Styles. Modifying the headline formatting like the normal text isn’t recommended.
By default, the table of contents will show you 3 levels of the headlines – Heading 1, Heading 2, and Heading 3 (h1, h2, and h3 in web terms.) You may also customize that if you wish to.
How to Customize the Table of Contents
With the help of the Table of Contents dialog box, a TOC can be simply customized. To open the dialog, select References > Table of Contents > Custom Table of Contents. By selecting a new format, you may customize a table in its entirety. Click on the Formats dropdown button in the General section and then select an appearance of your liking.
Change the way the TOC’s items look individually
Keep in mind that style definitions will ultimately determine how your TOC will look. By developing your own styles for the headers, you can adjust the table’s overall appearance.
- Click on Modify. If you find that the Modify button is grayed out, change the Format.
- Click the level you wish to edit in the Styles list, then click Modify.
- You can change the font color in the Modify Style dialog box.
Steps to create a clickable Table of Contents
- Open the Table of Contents pop-up, it should be under the Reference section.
- Click on the Custom Table of Contents… option.
- Click on the Use hyperlinks instead of page numbers checkbox to activate it.
- To make your TOC look more slick, uncheck the Show page numbers checkbox.
The ability to add a Table of Contents without any additional add-ons is one of the biggest advantages of MS Word. You should utilize it on larger documents to make them easier to navigate.