
If you are looking to register a domain online, GoDaddy is one of the first places where you should go to. They are one of the best domain registrars available today with a huge set of features, functions, and discounts beneficial for beginners to advanced users. Today we are going to write an article about registering a domain on GoDaddy with the complete step-by-step procedure. So if you have been looking for a tutorial that explains everything about GoDaddy domain registration, this is it.
What is GoDaddy?
GoDaddy is a domain registration and hosting service provider that was founded in 1997. So, it is a pretty old, and known domain registrar with millions of customers all over the globe.

GoDaddy is primarily used for easily registering domains and quickly integrating them to a selected hosting server. They provide everything required to start a successful online business, blog, or personal website. Irrespective of the platform of your choice, you can build your website on GoDaddy.
Why Should You Use GoDaddy Over Other Domain Registrars?
There are many reasons why you should use GoDaddy over other domain providers. While it is not necessary that you use GoDaddy for registering domains, it can be a lot more beneficial for you. Here are the reasons to use GoDaddy over other domain registrars.
- User-Friendly Interface: GoDaddy’s platform is like the friendly neighbor who’s always there to lend a hand. It’s intuitive and easy to navigate, even for tech novices. You won’t need a tech-savvy sidekick to register your domain.
- Vast Domain Selection: Imagine strolling through a massive mall with endless choices. That’s what GoDaddy offers in terms of domain extensions. Whether you’re after a classic .com or something more unique, they’ve got you covered.
- Competitive Pricing: Money matters, right? GoDaddy doesn’t break the bank. Their pricing is competitive, and they often run promotions and discounts that make it even more wallet-friendly. The coupons make it even better.
- Domain Management Tools: GoDaddy provides a virtual toolbox that’s stacked with nifty features. You can easily manage DNS settings, set up email forwarding, and even protect your personal information with privacy options.
- Reliability and Uptime: Nobody likes a flaky friend who’s never around when you need them. GoDaddy boasts high uptime rates, ensuring your website is accessible to your audience 24/7. You can almost forget about your website once set up. However, it is recommended to take a look to ensure the uptime.
- Customer Support: Think of GoDaddy’s customer support as your trusty hotline. They’re available round the clock to assist with any domain-related conundrums or technical glitches. There are obviously some occasional issues, but they are pretty great.
- Security Measures: In this digital era, online security is very important, and GoDaddy takes it seriously. They offer SSL certificates and domain privacy protection to keep your website and personal information safe from prying eyes.
- Additional Services: GoDaddy isn’t just about domains; they offer a smorgasbord of other services, from website hosting to website builders and online marketing tools. It’s like a one-stop shop for your online needs.
- Community and resources: Need some help? GoDaddy’s community and resources section is like a treasure trove of knowledge. You can find helpful articles, tutorials, and forums to assist you on your online journey.
Things to Consider Before Registering a Domain
Before you get into registering your domain name, you should ensure that you are aware of certain things listed below. It will help you to avoid some mistakes, especially if you are registering your first domain with GoDaddy.
Choose the Right Name
Your domain name is like the storefront sign for your online business. Make it catchy, memorable, and relevant to what you offer. Avoid complicated spellings or too many hyphens; you want people to find you easily.
Pick the Right Extension
The “.com” extension might be the go-to, but there’s a whole alphabet soup of options out there. Consider what suits your brand best – “.net” for networks, “.org” for organizations, or even location-specific extensions like “.co.uk” if you’re targeting a specific region.
Check Availability
It’s like claiming your spot at a busy park – your chosen domain needs to be available. Use a domain checker tool to see if your desired name is up for grabs. If not, be ready with some alternatives.
Trademark Check
You wouldn’t want to step on someone else’s toes, right? Ensure your domain name doesn’t infringe on trademarks or copyrights. Legal battles are no one’s idea of fun.
Think Long Term
Your domain isn’t just a one-night stand; it’s a long-term commitment. Consider how it’ll fit your brand in the years to come. Avoid trendy names that might age poorly.
Privacy Matters
Protect your personal information. Many registrars offer domain privacy services that shield your contact details from being publicly visible. It’s like having an unlisted phone number in the digital world.
Renewal Costs
Domains aren’t a one-time purchase; they come with renewal fees. Check the pricing structure to avoid any unpleasant surprises down the road.
Domain Registrar Reputation
Not all registrars are created equal. Do some sleuthing to find a reputable one. Read reviews, ask for recommendations, and ensure they have good customer support.
Content Planning
Your domain is the digital doorstep to your online presence. Consider what content or services you’ll offer on your website. It’ll help you choose a domain name that aligns with your goals.
Future-Proofing
Technology evolves, and so does the internet. Stay ahead by thinking about how emerging trends like mobile-friendliness and voice search may affect your website.
Backup Plan
Sometimes, things don’t go as planned. Have a backup domain name or two in mind, just in case your first choice isn’t available.
Budget Wisely
Don’t go broke just to secure a domain. Set a budget and stick to it. There are options for all price ranges, so find one that fits your pocket.
Steps to Register a Domain on GoDaddy
Registering a domain on GoDaddy is a pretty simple process. We will guide you through the entire steps one by one –
Step 1. Head Over to GoDaddy and Sign in
Obviously, the first step you have to do is head over to the GoDaddy website. After you reach the website, you should make sure that you are in the correct variation of the site dedicated to your country.

For example, if you reside in India, the website will be in.godaddy.com instead of www.godaddy.com.
If you wonder why it matters, because the pricing may vary from region to region, the payment methods available will be different, and the taxes will be also applied. So, using the correct region will allow you to save some money and apply coupon codes only available in a certain region. You can change your region and currency from the footer of the website.
If you haven’t created an account on GoDaddy, you should create one. You cannot register a domain on GoDaddy without creating an account. A GoDaddy account will allow you to manage all the domains and services you registered with GoDaddy. Creating an account from this step and signing in will allow you to avoid doing that in the middle of the domain registration process.
Step 2. Search for the Domain
When you are in the correct region, it is time to search for the domain that you want to register. The homepage itself contains a large search box where you can simply input the domain name and click on the Search Domain button. It will bring you several variations with the different TLDs (Top Level Domain).

We are guessing that you already have a TLD such as .com, .net, or a country-specific one like .in in your mind. If not, you can decide that from this screen. It will also list different prices for different variations. So you can choose accordingly.
Step 3. Add the Domain to Cart
Once you decide which domain you want to register, You can click on the Add to Cart button next to the appropriate TLD. It will instantly add the product to your cart which will be displayed on a sidebar popup. By default, GoDaddy will choose the period of the domain registration to 2 years. If you register for two or more years, you will get a discount for the first year. So you can decide whether you want that discount or you can simply choose one year from the dropdown.
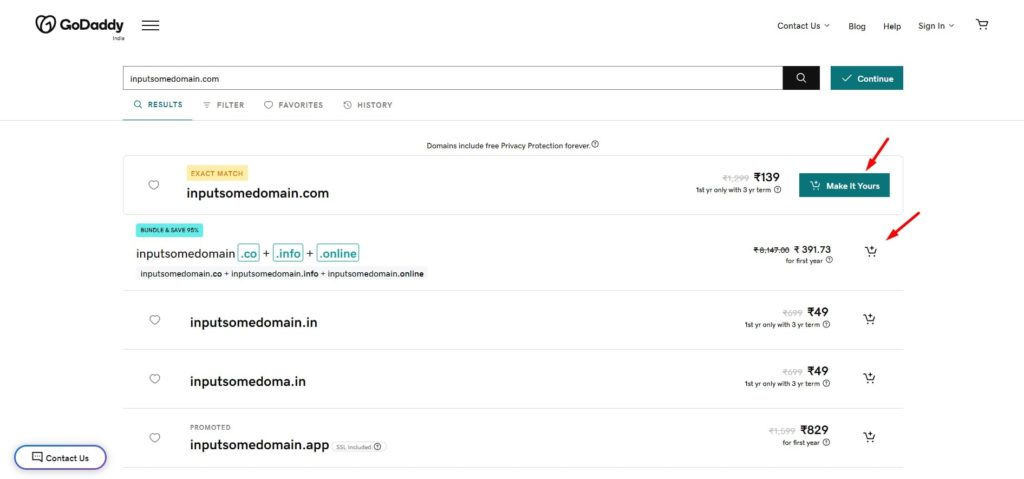
When you are ready and don’t want to register multiple domains at the same time, you can either click on the cart button in the top right corner or simply click the Continue to cart button in the popup.
Step 4. Choose the Additional Services
This step is very important. GoDaddy will automatically choose some additional features such as privacy protection, website builder, email account, etc. Most of these services will cost you additional amounts. Even though few of them offer discounts for the first year, they might cost you a fortune when you renew them.
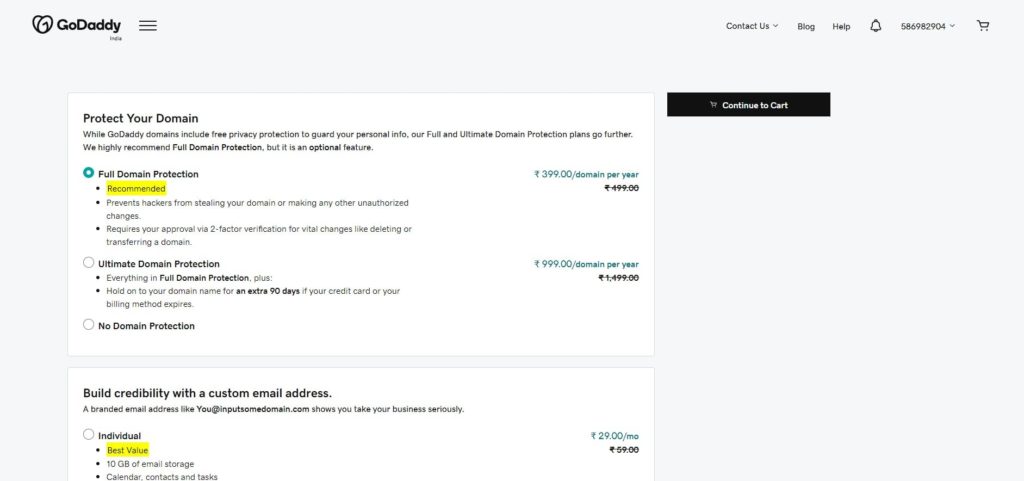
So if you do not need any of those services, be sure to choose the No thanks radio button under each one of them. If you need features such as Whois protection, you can keep them as well. As soon as you are ready, click on the Continue to cart button.
Step 5. Apply Promo Codes
On the next screen, you will see a link “Have a promo code?“. If you don’t know already, GoDaddy offers several promo codes once in a while, especially for new product registrations. You can apply those promo codes by clicking on this link.
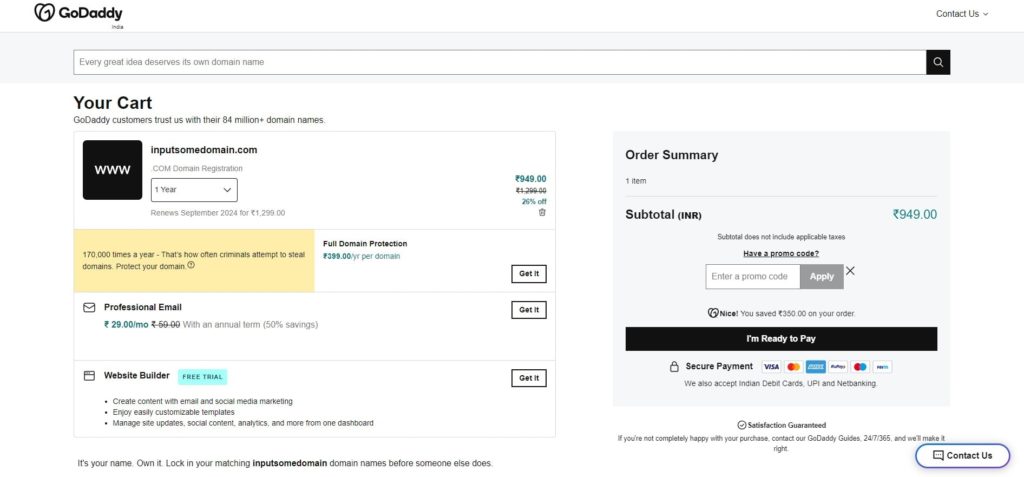
If it is valid, you will instantly see a discount in the pricing listed on the page. Promo codes are a great way to save a lot of money when registering domains on GoDaddy. Once you enter the promo code or don’t have one, click on the Checkout button.
Quick Tip: The simplest way to get some discounts or promo codes is by reaching out to GoDaddy support from the chat button available on the website. In most cases, they will graciously provide you with some discounts.
Step 6. Sign in (Optional)
If you already haven’t been signed in to GoDaddy, it will ask you to sign in. It is mandatory to create a GoDaddy account in order to register your domain. The details you provided with your account will be linked to your domain information. So if you haven’t already created an account, you will have to create one and enter the details in the sign-in section.

Step 7. Provide the Billing Information
In the next screen, GoDaddy will ask you to enter your billing information if you haven’t connected a credit card or other payment methods with your account. You can also use your PayPal account to make payments.
If you choose to enter the credit card details, the “Use as backup payment method for this account” option will be selected automatically. That means the credit card will be stored on your account for future payments.
If you do not want that, be sure to uncheck this option. The same applies to your PayPal account as well.
The accepted payment methods will vary from region to region. Some countries will have internet banking methods and some others won’t. So if you do not see a certain payment option on the screen, that means it is not yet supported in your country. As I mentioned in the first step, make sure that you are on the correct GoDaddy website dedicated to your region to see the correct payment methods for your country.
Step 8. Complete the Purchase
As soon as you provide the correct payment information, you will be taken to the page where you can complete the purchase. This step will be different for different regions. But the idea of the page is letting you complete the purchase by either charging your already connected payment methods such as credit card, PayPal, etc., or taking you to a payment gateway where you can enter the payment details.
Just follow the onscreen instructions to complete the payment. If you successfully make the payment, it will show you a success message with a receipt.
Step 9. Verify the Domain is in your Account
Now that you have successfully registered a GoDaddy domain, you just have to make sure that it is correctly added to your account. In order to do that, click on the User icon at the top right corner of the screen and choose the My products option.
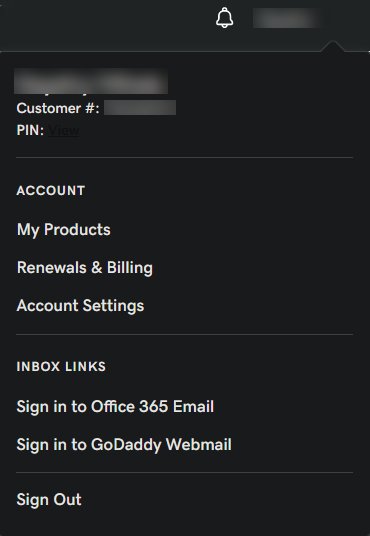
It will take you to the GoDaddy products section where it will list all the products that you have purchased from GoDaddy. If you see the domain there, that means the product is successfully added to your account. If not, verify if you were charged from your bank account. If the money has been deducted, wait for a few hours to see if the problem is temporary. And after that reach out to their support.