
Consoles have a few differences when compared to a computer. The most prominent ones are the price, the number of graphical settings you can enable without losing optimal performance, game exclusives, and the lack of a keyboard and mouse. The last one can prove troubling when you’re playing a game on your console and unconsciously think of pressing Print Screen or a custom key combination for taking screenshots you set. Luckily, the activity is just as easy on your Xbox. Here’s how to take a screenshot on Xbox.
How to take a screenshot on Xbox One?
Before we start, it’s important to know that through the console’s interface, you can only take a screenshot while in a game, not on the home screen. These are the steps to take a screenshot on Xbox One console –
- Enter any game on your Xbox.
- At any point, press the Xbox button in the center of your controller.
- Option 1. Press Y once the menu pops up, which will save a screenshot.
- Option 2. Manually scroll to the Capture Screenshot option. It’s under the Capture & share menu (Broadcast & capture in some versions).
How to take a screenshot of your Xbox on PC?
Microsoft has long had a goal of integrating their consoles and their computer operating system, Windows 10. The finally achieved it using Xbox Live, their cross-system gaming network. With it, it became possible to play console exclusive games on your computer. But it also makes it easy to take screenshots and record games.
Step 1 – Enable and configure Game DVR (Now Xbox Game Bar)
These are the steps to enable and configure Game DVR feature on Windows 10 –
- Launch the Xbox app on your Windows 10 computer.
- Go to Settings, then Game DVR in the top left corner.
- Verify that Record game clips and screenshots using Game DVR is ticked/enabled.
- Optional. Under Keyboard shortcuts, change the shortcut for taking screenshots by clicking on the box next to Your shortcut, then pressing a key combination on your keyboard. Or, you can leave it as None, and simply use the Windows default shortcut, Windows logo key+ Alt + Print Screen (PrtScn).
- Scroll down until you find a section named Saving captures. Take note of the location, which is C:\Users\%username%\Videos\Captures by default.
Recently, Microsoft replaced the Game DVR feature with Xbox Game Bar. It works similar, but provides a much better interface and functions.
Step 2 – Take screenshot
These are the steps to take an Xbox screenshot from your PC –
- Enter any game.
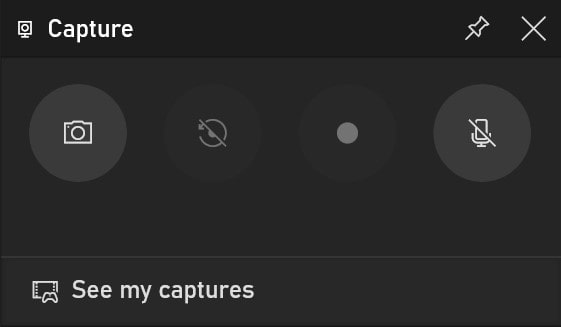
- Option 1. Using your computer keyboard, press the Windows logo button + G. Or, if you have the controller connected to your PC, press the Xbox button. Choose the Take screenshot option (the camera icon in the bar).
- Option 2. Use the shortcut defined in the Game DVR options. This will only work in your previously put a checkmark on the box in front of Yes, this is a game in the Xbox Game Bar.
- Option 3. Open the Start bar, type Snipping Tool (on newer versions of Windows it’s called Snip & Sketch), and open the app of the same name. It is not bound to the game and allows you to take the screenshot of Xbox’s welcome screen, as well as other menus.
How to take screenshots on Xbox with voice commands?
To take screenshots using voice commands on your Xbox, you have two options –
- Kinect motion sensor – Older versions of the Xbox has the feature Kinect motion sensor. You can use that to take a screenshot by saying “Xbox take a screenshot“.
- Cortana – If you are using the newer models, you can say “Hey Cortana, take a screenshot” instead.
You will have to enable the voice control options from the Xbox settings in order to start controlling your Xbox with voice.
Where are Xbox screenshots saved?
Although this should be obvious, we’ll mention it. You need to have either an Xbox Live Gold or Xbox Game Pass Ultimate account to save and share screenshots.
- At any point, press the Xbox button.
- Use the controller to scroll to the Capture & share (or Broadcast & capture) menu. It is marked with a satellite dish icon.
- Scroll down and choose Recent captures.
- You’ll see a collection of all of your recent screenshots on the left-hand side of the screen. By selecting them, you can expand them to full size.
- Optional. Scroll down and select Show all to see the full list of screenshot thumbnails.
How to preview an Xbox screenshot on a Windows computer?
- Option 1. Press the Windows logo key to open the Start menu. Type ‘Xbox’ and open the app of the same name. Navigate to the Game DVR option in the middle of the menu on the left-hand side. Click On this PC in the top left corner.
- Option 2. Open any Xbox game on your computer. Press the Windows logo button + G on your keyboard or the Xbox button if your controller is connected. From the menu, select Captures.
- Option 3. Use the direct path. Press the Windows logo key, type Run and open the app of the same name. Paste the default path for Xbox videos and screenshots, which is C:\Users\%username%\Videos\Captures into the box. You’ll see a folder with all of the files. If you used a different account to log into Windows, you can change %username% with the name of the user account connected with Xbox Live.
How to enable 4K HDR Xbox screenshots?
For this option to be available, your Xbox One needs to be able to output 4K video and your TV or computer monitor needs to be able to display 4K resolution. Additionally, if your screen supports HDR in any capacity, the screenshots will be able to reflect the increased dynamic range, although this is not a requirement.
- Press the Xbox button on your controller.
- Go to Settings (the cogwheel icon on the far-right) then choose System.
- Choose Preferences, then Broadcast & capture.
- Navigate to Game clip resolution.
- Select 4K SDR if your TV doesn’t support HDR. Otherwise, choose 4K HDR.
How to backup Xbox screenshots?
This serves two purposes. One, it’s comforting to have a backup, ready to be downloaded should a failed update, power outage, or a software/hardware error wreak havoc on your Xbox. Two, if you have the habit of taking 4K screenshots and videos, the storage space on your Xbox will quickly become full. You can transfer those to the storage drive on your PC, and delete them from your Xbox. We will assume you’ve connected Microsoft OneDrive, one of the best cloud storage options for photos, to your Xbox Gamertag.
How to backup screenshots on Xbox?
- Press the Xbox button on your controller.
- Choose Broadcast & capture.
- Select Recent captures.
- Choose to See all if the screenshot isn’t recent.
- Navigate to a screenshot you wish to upload. Select it.
- Option 1. Choose Share, then OneDrive.
- Option 2. Select Upload to OneDrive.
How to backup Xbox screenshots on PC?
- Option 1. Open the Start bar. Type Xbox and open the eponymous app. Navigate to the Game DVR option in the middle of the menu on the left-hand side. Switch the view of recent screenshots by clicking on the option that says On Xbox Live. From there, you can rename and download screenshots and videos to your PC.
- Option 2. Open the Start bar and type OneDrive to open the app. Look for a folder named Xbox Live, Capture, or Videos in the OneDrive directory. Browse and download screenshots to your computer from there.