
Taking screenshot is one of the most common things while handling an Apple Mac. Whether to teach your friend something or to write a blog post, screenshots are always helpful. So, in this article, we are going to provide several methods to take a screenshot on your Mac computer. These simple steps will be extremely easy, and you will be able to capture the Mac screen without sweating much. Let’s directly look into the ways to take screenshots in a MacBook or iMac that runs any version of the macOS.
Quick Ways to Take a Screenshot on Mac
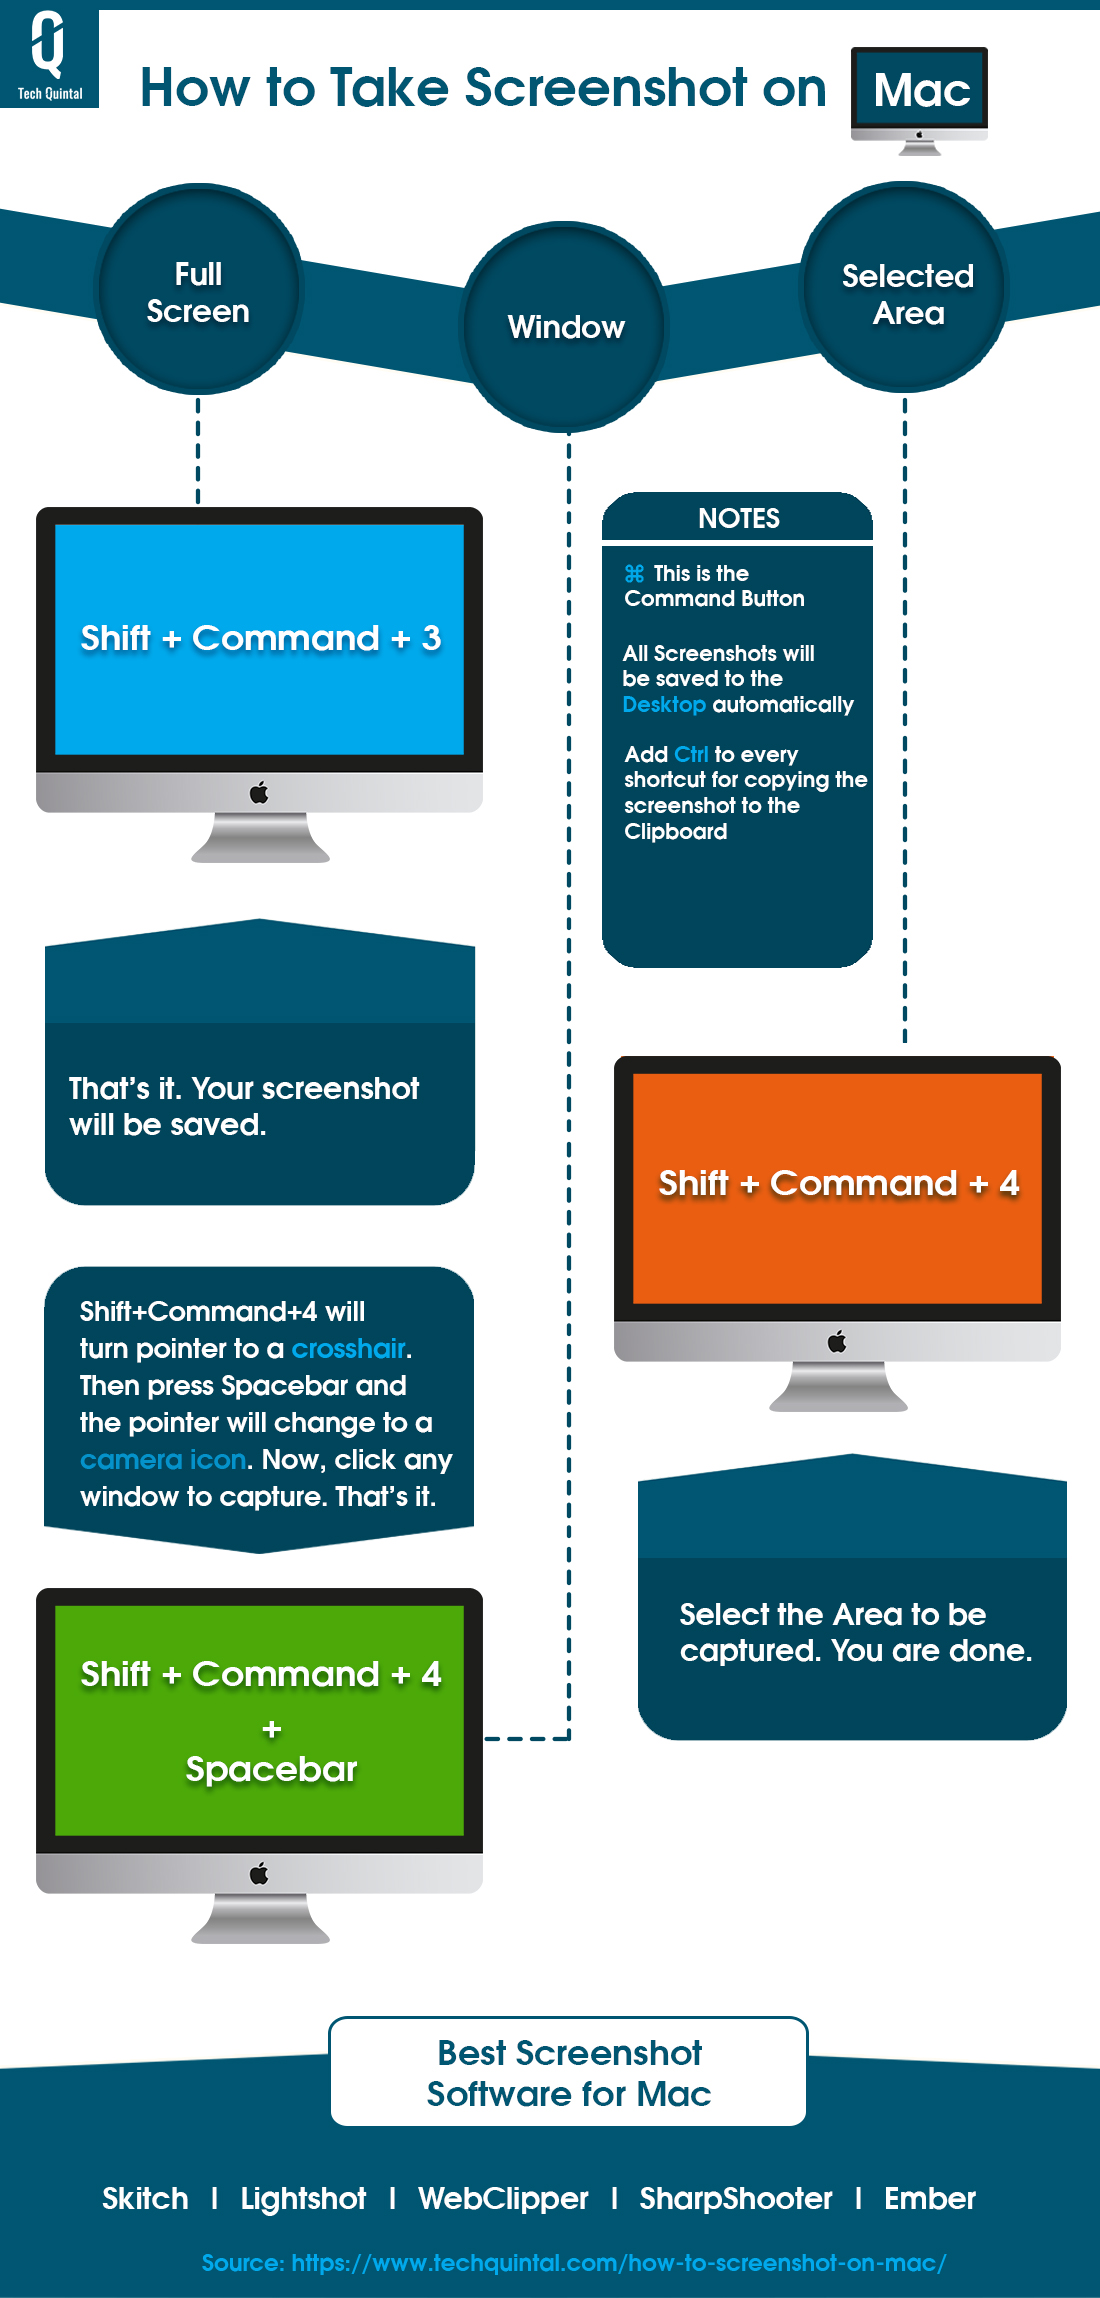
To take a screenshot on a Mac, press Shift + Command + 3 for the entire screen, or Shift + Command + 4 to select a portion of the screen. The screenshot will be saved automatically to your desktop as a .png file.
| Screenshot Type | Keyboard Command |
|---|---|
| Entire Screen | Shift + Command + 3 |
| Portion of Screen | Shift + Command + 4 |
| Specific Window | Shift + Command + 4, then Spacebar |
| Screenshot with Touch Bar (if available) | Shift + Command + 6 |
| Open Screenshot Utility | Shift + Command + 5 |
Infographic of Taking Mac Screenshot
Before starting the procedure, have a look at our cool infographic on how to take screenshots on Mac which will let you grab the entire idea of this article within seconds.

Get the high-quality version here.
As already mentioned, there are several methods to screenshot a MacBook or iMac. Before stepping into unconventional methods, let’s begin with the official methods provided by Apple itself.
How to take screenshots of the entire Mac screen
There will be several situations where you need to take a full screenshot of your Mac screen, including all the windows and programs. If so, follow these steps.
- Open the screen that you want to capture.
- Press Shift+Command (⌘) + 3.

- The screenshot will be saved as a PNG file on your Mac desktop.

How to take a screenshot of a selected portion of the Mac display
A selected portion screenshot is when you just want to grab a portion of the screen instead of the entire window. You could select the area that you wanted anywhere on your screen.
- Open the screen that you want to capture a portion of.
- Now, press Shift + Command + 4 (MacBook screenshot shortcut.)
- The pointer will change to a crosshair-like structure.
- Now start moving the crosshair by dragging it to select the area where you want to take the screenshot. You can hold the Shift key, Option key, or the Space bar for having better control over the selection. They will help you to keep the aspect ratio and move the selection area as per your requirements. If you want to cancel the selection, press the Esc key before you release the mouse or trackpad.

- The screenshot will be saved as a .png file on your desktop.


This method can be used to take screenshots of the menu on a MacBook or iMac or any portions of the OS. The next method can also be used for this.
How to screenshot MacBook window
In case you need to capture a window in Mac, these steps can help you in the process.
- Highlight the window that you wanted to take the screenshot of.
- Press Shift + Command + 4.
- The pointer will change to a crosshair.
- Now, just press the Space bar.
- The pointer will change to a camera icon.
- Move the cursor over the window that you want to capture and just click anywhere on the window.
- You’ve successfully taken a screenshot of the Mac window, which you can find on the desktop.
How to take a screenshot of the Touch Bar
If you own one of the latest Mac systems with a Touch Bar and running on macOS Sierra 10.12.2 or later, you can also capture screenshots of the Touch Bar! If you want to do so, just follow these simple steps.
- Simply press Shift + Command + 6.
- And that’s it. The screenshot will be saved to your desktop.

Extra methods to capture screen on Mac
Now, we tried all the official methods. Now, it is time to look into further methods for taking the image of the Mac screen. We will use several tools or 3rd party software to take screenshots as per your requirements.
1. Using the Grab Utility tool
Grab is a built-in application created by Apple Inc. for the Mac OSX system which is used to take screenshots. Let’s see how.
- In your Mac, Go to Applications > Utilities > Grab. Just a reminder: the Grab will not open any windows. It will just display a new menu on the screen.

- Now, click on the Capture menu option. It will display four methods you can take the screenshot.
- Take the screenshot using any one of them as per your requirements.
- After capturing the viewport, Save it from the files menu.

2. How to Save a Screenshot to the Clipboard
How do you copy and paste a screenshot on Mac? If you don’t know the answer, follow these steps.
- Press Command + Control + Shift + 3 for the entire screen, and Command + Control + Shift + 4 for the selected portion. Instead of directly saving the screenshot to the desktop, the Mac will copy it to the clipboard.
- Now, use the Command + V keys to paste it almost anywhere you want.


That’s all you have to do to copy a Mac screenshot to the clipboard. Alternatively, have a look at the following video by Griffin Hammond, which will give you a live tutorial on almost all of the above-listed methods.
3. Take Screenshot using third-party tools
If any of the above methods doesn’t seem to be impressive to you, things are going to change now. There is plenty of third-party screenshot software available on the market that has numerous extra functions to take, edit, and export beautiful screenshots of your screen. We are listing some of the most popular screenshot software for Mac.
They will not only allow you to print screen on Mac with some high-quality screenshots but will also provide a bunch of useful tools to edit and stylize them. So, give them a try.
4. How to Take a Mac Screenshot Without a Keyboard
You can take a screenshot on a Mac without a keyboard by using the built-in application called “Screenshot.” Here are the steps:
- Open the Launchpad (by clicking its icon in the Dock or pinching your thumb and three fingers together on your trackpad).
- Click on the “Other” folder.
- Select and open the “Screenshot” app.
- Choose from the options at the bottom of the screen:
- Capture Entire Screen
- Capture Selected Window
- or Capture Selected Portion.
- Click “Capture“.
- The screenshot will be saved automatically to your desktop or the Mac screenshot location you’ve set.
Common questions on taking screenshots on Mac
Still, most of you encounter numerous problems during the process of taking screenshots, especially those who just purchased their first Apple product. To help you with this, we have listed the most asked questions regarding the screen capture on Mac. You could have a look at it for solving your issue.
1. Where are screenshots saved mac
If you can’t find screenshots on your Mac, just look at your desktop. Mac saves the screenshots on your desktop by default.
2. My screenshots aren’t saving
Actually, your screenshots are saved somewhere. Probably, it is on the desktop. If you have previously done any tweaks to the screenshot location, you might need to look back at it.
3. Where is the Shift button on the Mac

As you can see in the above image, there is nothing to worry about regarding the shift key on the MacBook or Apple keyboard, it is in the same position.
4. How to paste a screenshot on a Mac into an email?
There are no shortcuts for pasting or uploading a screenshot to email. Just capture the screen and upload the image to the email attachment as you normally do.
5. How to paste a screenshot on a Mac into PowerPoint?
As already said, this also has the same steps. Just take a screenshot and attach it to the PowerPoint document as you normally do. Nothing special about it.
6. How to take a screenshot of a Word document?
Again, the answer is the same. Just capture the display or whatever you want, and copy and paste the screenshot to the desired location. Even if it is a Word document, the steps are the same.
7. Command + Shift + 4 not working
If the combination of Command + Shift + 4 (To take the screenshot of a selected portion of a window) keys is not working, you could try logging out of the OS and logging in again. If it is not working, try restarting your system. If the result is still the same, go for the Command + Shift + 3 buttons, which will take a screenshot of the entire screen. Then crop it by using some image editing programs such as Photoshop or the tools available on the internet (such as Photopea).
8. How to paste a screenshot on Google Docs?
As mentioned above, you could go for the manual method or depend on some extra programs that help to directly take screenshots to Google Docs. There are several browser extensions available for this purpose.
9. How to paste a screenshot on Mac?
You can use the Command + Control + Shift + 4 shortcut to copy the screenshot to the clipboard. Then, simply use the Command + V to paste it wherever you want.
10. How to screenshot on MacBook Air or Pro?
All the steps are the same for capturing the monitor in the MacBook Air and Pro as well.
11. Can I take a scrolling screenshot on my Mac?
Yes. You can take a scrolling screenshot on Mac. Simply follow the steps mentioned in the Mac section of our article on taking scrolling screenshots.
How to screenshot on Mac is no more a question in your mind. We’ve described most of the possible ways to have a picture of your screen easily and efficiently. No matter how much of an expert or beginner you are on macOS, these steps will guide you through all the procedures in a simple manner. So, wait no more to be a screenshot expert.