
Setting up a brand-new iPhone might look intimidating to first-time users. The same can be said for people leaping an earlier version of iOS – they’re often unsure whether they can do it right. But why feel insecure? Think about it – the use of the iPhone is widespread. It’s almost guaranteed that there are people who have gone through the process successfully with far less knowledge than you. If that didn’t cheer you up, how about this? We’re prepared to guide your hand every step of the way. Did that calm down your anxiety? If so, let’s begin. Here’s how to activate iPhone using iOS 14:
What is iPhone Activation?
iPhone activation is akin to shaking hands with your new friend for the first time. It’s where your device steps onto a virtual stage, takes a bow, and begins its journey as your trusty sidekick.
In technical terms, it’s the process of registering your iPhone with Apple and connecting it to a cellular network if you’re using a SIM card. This handshake between your device, the Apple server, and possibly your carrier ensures that your iPhone is legitimate, not stolen or blocked, and is eligible to be used under your name. It involves setting up your Apple ID, preferences, security measures, and so much more.

But don’t fret! As we’ve shown before, this process is simple and guided every step of the way. It’s like having a trusted pioneer leading you through uncharted territories, making sure you reach your destination safe and sound. So, do you feel ready to embark on this journey? If yes, then brace yourself for an adventure!
Why Does iPhone Need to be Activated?
Imagine buying a car but not putting the keys in the ignition – it looks great in the driveway, but you can’t really go anywhere. That’s what an inactivated iPhone is like.
Activation serves as the bridge between your shiny new iPhone and its vast possibilities. It’s not merely about turning on your device; it’s about bringing your iPhone to life. Here’s why activation is crucial:
- Verification: The process of activation verifies that your device is genuine and ensures that it hasn’t been reported stolen or lost. This security measure protects against illegal activities.
- Carrier Registration: If you’re using a SIM card, activation allows your iPhone to connect with your carrier’s cellular network, enabling you to make calls, send texts, and use data when away from Wi-Fi.
- Initial Setup: Activation isn’t just about connecting to networks. It’s also when you set up fundamental aspects of your iPhone experience, such as language, region, and accessibility features. Think of it as customizing your vehicle before hitting the road.
- Apple Services: An activated iPhone gives you access to Apple’s ecosystem of services. This includes the App Store, iCloud, Siri, FaceTime, and much more. It’s like being handed the keys to a plethora of gated communities.
Additional Benefits of Activating an iPhone
Activating your iPhone is like lighting a candle in a dark room. The potential of what lies within shines forth, illuminating all the possibilities awaiting exploration. Here’s what you’re unlocking when you activate your iPhone:
1. Access to an Ocean of Apps
With an activated iPhone, the world becomes your oyster with the App Store at your disposal. You can dive into millions of apps spanning categories from education to entertainment.
2. Stay Connected, Always
Whether it’s to call your mom or send cat memes to your friends, activating your iPhone with a carrier plan provides countless ways to keep in touch with your loved ones. If you want to use the device to its fullest, you should activate it first.
3. Your Personal Assistant, Siri
Need reminders for your tasks? Or perhaps you want someone to tell you a joke? Siri, your personal digital assistant, comes to life once you’ve activated your iPhone.
4. Secure Your Device
Through activation, features like Face ID, Touch ID, Find My iPhone, etc., ensure that your device is securely locked and can be tracked if lost.
5. An iCloud of Your Own
Activating an iPhone also sets up your very own iCloud account. This not only keeps your data safe but also syncs it across all your Apple devices.
Steps to Activate iPhone
Here is the simple 10-step process to activate your iPhone –
Step 1. Insert your SIM card (Optional)
Why optional? Because there are three situations you can encounter:
- Inserting the SIM card is required. Bought your iPhone independently of a carrier payment plan? After you obtain a SIM card yourself, follow these steps:
- Find the hybrid SIM slot – it’s in the shape of an ellipse on the right side of the iPhone.
- Insert the SIM card ejector tool into a tiny hole nearby.
- The tray will pop out slightly.
- Drag it out and place the SIM card onto it.
- Slide the tray back in.
- Carrier has inserted the SIM card for you. If you purchase the iPhone as part of a subscription plan, they usually insert the SIM card before they send the smartphone to you.
- You are using an embedded SIM card. In this scenario, the SIM chip is soldered onto the motherboard. The chip is programmed when you activate the SIM card with your carrier.
Step 2. Turn on your iPhone
The first step toward activating an iPhone is turning it on. Hold down the Power button (on the right side) for a few seconds. Release it when the screen flashes and the Apple logo appears. You’ll be greeted with the “Hello“ message. Choose your language, and country or region.
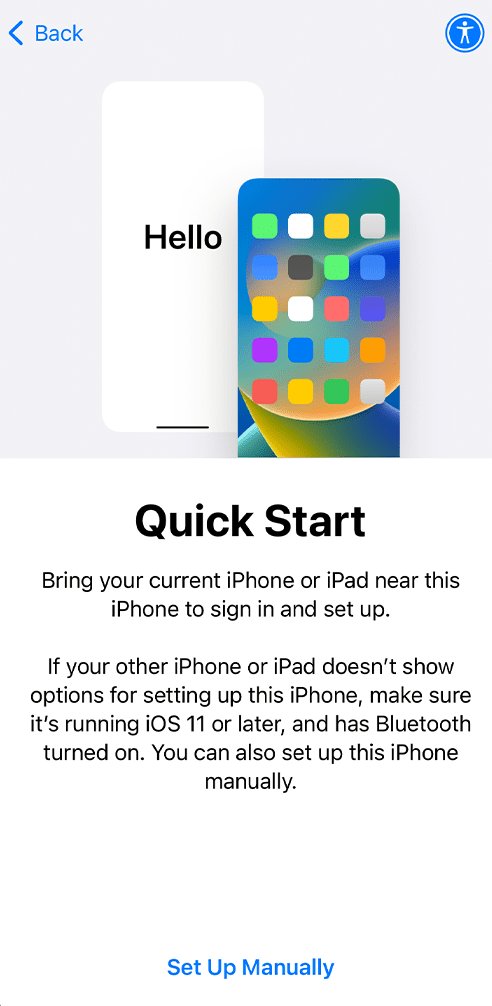
Step 3. Use Quick Start (Optional)
This feature allows for quick iPhone activation if you have another iPhone using iOS 11 or later. It will automatically transfer your Apple ID, Touch ID, Face ID, passcodes, and data via Bluetooth/from iCloud/wired, via Lightning to USB cable. To demonstrate the process in-depth, we tapped on Set Up Manually.
Step 4. Connect to a Wi-Fi network or use mobile data
On this screen, you have two options:
- Choose a Wi-Fi Network. Preferred method. Your home Wi-Fi connection at home is stable, faster, and has unlimited bandwidth and data. As an alternative, you can find the nearest Wi-Fi hotspot.
- Use Cellular Connection. Your SIM card must be activated for this to work. Furthermore, depending on the plan you have with the carrier, it might be slower (unless it’s 5G) and data-limited, and end up costing you money.
Step 5. Set up Face ID and/or Touch ID
The first two options aren’t required. However, we strongly recommend picking one or both, since they improve security considerably. Here’s what they mean:
- Face ID. iPhone will use an infrared camera to casts hundreds of invisible dots and make a 3D scan of your face. Afterward, you can unlock your iPhone hands-free, by pointing the front camera toward your face.
- Touch ID. Press one or more of your fingers onto the fingerprint scanner, and it’ll be saved into the database. You can then unlock the iPhone with a touch of a finger.
Tap on Set Up Later in Settings to skip. Configuration of the third option, Setting up a passcode, is mandatory. It will act as a failsafe when you can’t or don’t want to use Face ID or Touch ID. By default, it’s 6-digits long. You can tap on Passcode Options to choose a different length, format, or disable the passcode.
Step 6. Download data and information (Optional)
You may also choose to restore your iPhone if you want to transfer data from your old device. This is basically Quick Start, but with additional options such as:
- Restore from iCloud Backup.
- Restore from Mac or PC.
- Transfer Directly from iPhone.
- Move Data from Android.
Pick an option accordingly. Based on the device, you can use wired (Lightning to USB cable) or wireless (Wi-Fi, Cellular Data, Bluetooth) connections. We’ll cover the required steps in separate articles. For now, our focus is on users without other devices, so tap on Don’t Transfer Apps & Data.
Step 7. Sign in with your Apple ID
For new Apple users, we’ve created a detailed guide on how to create Apple ID. If you have an old account for Apple services, you can sign in with it instead. Important. If it’s a second-hand phone and the previous owner didn’t disable Activation Lock, he or she will have to sign in with their Apple ID first.
Step 8. Enable automatic updates
We recommend allowing automatic updates on this screen (tap on Continue). Apple will notify you before they install any of them. However, they are downloaded automatically (in the background).
Step 9. Enable Siri, iCloud Keychain, or Apple Pay
None of the three options need to be set up immediately. However, here’s what to expect if you do:
- Siri. Apple’s intelligent personal assistant. You’ll need to speak a few phrases so it gets used to your voice.
- Apple Pay. Apple’s contactless payment system, eliminating the need to carry credit, prepaid, and debit cards or cash.
- iCloud Keychain. This security feature will save, sync, and auto-fill passwords on all devices signed in to the same Apple ID.
Step 10. Set up screen options (Optional)
These are the final steps before you are ready to start using your iPhone. Here’s what’s offered:
- Screen Time. Allows you to see the time your screen was on, and which apps were used. You can also set up time limits for certain apps.
- App Analytics. Allow usage data and crash logs to be shared with iOS developers for improvement.
- True Tone. Let iPhone analyze the ambient around you and alter screen settings accordingly.
- Appearance. Change the look, feel, and size of home icons and wallpaper.
- Display Zoom. Increase the size of on-screen elements.
You’ve done it! What’s Next?
Once you see the “Welcome to iPhone“ message, swipe anywhere, and you’ll see the home screen of an iPhone. Congratulations, that means you completed the iPhone activation process!
Personalize Your iPhone
After activation, personalization is the next step to make your iPhone truly yours. Here’s how you do it:
Change Wallpaper
Your wallpaper can be a great way to express your personality or mood. To change it:
- Go to Settings > Wallpaper > Choose a New Wallpaper.
- You can choose from Dynamic (animated wallpapers), Stills (static images), and Live (interactive wallpapers that respond when you press them).
- Tap on Set after selecting your preferred wallpaper, then decide if you want it for your Lock Screen, Home Screen, or both.
Organize Apps
Apps are what make your iPhone functional and personalized. You might want to organize similar apps into folders or arrange them based on how frequently you use them:
- To move an app, tap and hold its icon until it starts wiggling. Drag it to the desired location.
- To create a folder, drag an app over another. iOS will automatically suggest a name for the folder, but you can rename it.
Maintain Your iPhone’s Performance
To keep your device running smoothly and securely, regular maintenance is essential. Here are some tips:
Regular Software Updates
Beyond the initial setup, ensuring your software is always updated is important as it often includes security patches and new features. To check for updates:
- Go to Settings > General > Software Update.
- If an update is available, tap Download and Install.
Battery Management
Proper battery management can greatly extend your iPhone’s lifespan. You can monitor your battery usage by going to Settings > Battery. Here, you can see which apps are consuming the most power and make necessary adjustments.
Troubleshooting Common Issues
Even with Apple’s intuitive design, you may encounter some common issues. Here are ways to troubleshoot them:
iPhone Not Charging
If your iPhone isn’t charging, try these steps:
- Check your charging cable and adapter for any signs of damage.
- Try a different charger or cable if possible, or try charging from a different power source.
- If the problem persists, it may be a software issue or a problem with the charging port itself, requiring professional assistance.
iPhone Running Slowly
If your iPhone seems to be running slower than usual, there could be several reasons. Too many open apps, low storage space, or an outdated operating system can all contribute. Here’s what you can do:
- Close unnecessary apps running in the background.
- Clear up storage space by deleting unused apps or moving photos/videos to iCloud.
- Update your iOS to the latest version.
Remember, even with the best practices, sometimes issues may persist, and seeking help from Apple Support or an authorized service provider may be necessary.